Showing posts with label Computer Tricks. Show all posts

Monday, August 22, 2011

Free Calling | Make 20sec call through Internet


If You wanna say somethin Small, Like Coming Outside of Home, 

Or Meeting Somewhere 

Or Anything, 

and Lacking Balance, and its so urgent...

You can use.....


Go ON thE Website,

Put THe Phone Number And You CAn MAke Calls..

Calls last for 20sec, but its enough for saying small things...

There Is a limit for 2 calls..

but change your ip, clear cookies, cache and go on the website again,

again make the calls...Enjoy..


Monday, August 15, 2011

How to Install Android OS on your PC | Latest Tricks


Mobile phones under the android platform always deserve a best place in market. So if you got messed with android OS and want to try it in your netbook or laptop here is the procedure to experiment it. You can install in your memory cards or flash drives to test android OS on your system.
Download android from Android-x86 and copy it in your flash drive or memory card. Scroll down and download it from the stable release section of the site. This will download an ISO file from the website. Also Make sure your memory device having memory more than 256MBand make your memory drive clean before copying android into it.

How to Use Android on PC ?

You also need UNetbootin (Universal Netboot Installer) to run android on your system. So download it from UNetbootin site. It is available for all the leading operating systems. So choose your OS to download UNetbootin from the site.
Now I have downloaded UNetbootin for my windows platform. All you need to do is insert your drive which you going to install your android OS. UNetbootin extracts the ISO file of android OS which you downloaded and install it in the target disk. The first step of your installation is shown in the screen shot below.
After selecting the target disk, android will start extracting from ISO file and installed in your disk. Now your flash drive will get installed with android OS. This may take few minutes depending on the speed of your flash drive.
Once you get done with the process you will asked to reboot your system. If you wish you can reboot system immediately or else you just exit and run android when you want. Now your system is ready to run android OS. All you need to do is reboot your system with the flash drive. Change the boot setup to boot from removable disk.
In default it will be available to boot from your hard drive. So press F2 on reboot of your system. Go to Boot menu in the BIOS setup and change the boot setup to boot from removable disc. Then press F10 to save your changes and exit from BIOS setup. Now your system will restart and boot from your removable disc. This will bring a menu infront of you with the following options.
Select Live CD- Run Android-x86 without installation. Then your android OS will start booting and you need to wait for few minutes until it gets loaded. After a couple of minutes you will straightly get into your personal desktop. The default applications will be available on the home screen and for more applications go to menu and select the applications you need.

How to Use Android as PC

By default android give access to webcam and Wi-Fi. So that after entering into the menu you can install the apps you need. You can carry your memory card or flash drive to anywhere and use your own android OS. But your apps installed will be gone when you reboot your system or when you put your removable device in another system. This provides a better interface for the persons who are all using the public systems.
Follow these steps, try installing android in your system. share your comments and doubts in the comment box below.

Sunday, August 14, 2011

Trick | How to break winrar password


today's post is about how to crack password of winrar
In order to protect your winrar files frm others reading, you set the password with your files. After a long time, you forgot the password. Is there any way to break passwords in winrar?

WinRARis a powerful tool allows you to create, manage and control archive files. It consistently makes smaller archives than the competition, saving disk space and transmission costs. Winrar itself can not break password for you. You need another tool which is Rar Paswrd Recovery to find your winrar password back.


here is all the step to do this:


Step 1: Download Rar Password Recovery Magic , then install it on your computer.

1. Install the application.
2. Register the application with the details below:

Name.....: YPOGEiOS
Serial...: RPRM2699978
Step 2: Double click on Rar Password Recovery icon, make sure it is running.

RAR Password Recovery Magic A tool which can recover lost passwords for RAR / WinRAR archives.RAR Password Recovery Magic is a powerful tool designed to recover lost or forgotten passwords for a RAR/WinRAR archives.

Install GNOME 3 on Ubuntu 10.04


Today I will teach you how to install the GNOME 3 desktop environment on the Ubuntu 10.04operating system.GNOME 3 comes after five years of hard work.It brings totally redesigned user interface, a lot of hot new features, improved applications, new translations and updated documentation.

What is Gnome 3 ?

GNOME 3 is the next evolution of the GNOME desktop environment, and it has been released on April 6th, 2011, on mirrors worldwide. GNOME 3 is a light desktop environment used in many popular Linux distributions, such as Ubuntu, Mandriva, PCLinuxOS, etc.

Key Features of  ”Gnome 3″

  • Extremely elegant and easy-to-use desktop

  • Side-by-side window tiling, in order to handle multiple windows easy and simple

  • A revamped file manager

  • You can easily organize windows with totally revamped workspaces

  • Smoother and faster desktop experience.

  • A pleasant experience for every user.

Step-by-step Tutorial to Install Gnome 3

Step1:
Press ALT+F2 key on your keyboard, check the “Run in terminal” option and paste the following command in the “Run Application” dialog,
sudo add-apt-repository ppa:gnome3-team/gnome3

A terminal window will open enter your password when asked.

The terminal window will appear for a few seconds, and it will automatically close.

Step2:

Press ALT+F2 key combination again, check the “Run in terminal” option and paste the following command in the “Run Application” dialog,
gksu apt-get update

As previous step enter your password when asked. A terminal window will appear for a few seconds, and it will automatically close.

Step3:

Press the ALT+F2 key combination again, check the “Run in terminal” option and paste the following command in the “Run Application” dialog,
sudo apt-get dist-upgrade


terminal window will appear. Enter your password and hit Enter. When you will be asked if you want to upgrade your packages, type and hit Enter. The terminal window will automatically close when the installation is over.

Step4:

That’s it icon smile How to Install GNOME 3 on Ubuntu 10.04 GNOME 3 is  installed on your Ubuntu machine. Just reboot your system and choose Ubuntu GNOME Shell Desktop at the login screen.
Gnome 3 Stylish Deasktop Environment How to Install GNOME 3 on Ubuntu 10.04
Enjoy your new GNOME 3 desktop environment icon wink How to Install GNOME 3 on Ubuntu 10.04  The upcoming Ubuntu 11.04 (Natty Narwhal) Linux distribution comes with GNOME 3 desktop environmen

Saturday, July 16, 2011

Capturing a Web-page with only single click


We always come across many situations where we want to save a web-page information for future reference. Generally we use select-copy-paste method to save or we may use Save page as option from browser itself. Often we may face difficulties in reading those save file because of formatting issues. A simple solution to this.
First copy the required page link. You can use Cntrl+C or copy option from right click drop-down list.
Simply click on this link Capture Me!


If you want to capture file which is readable on adobe reader or foxit reader then choose pdf. 
Just hit capture button and save the file

Saturday, July 9, 2011

Error: The File you are trying to Delete is in use by another Program **SOLVED**


Can't Delete a specific Folder/File because another program is using it? And you don't Know which program is using it? Well, it happens with me most of the time when I try to delete something which I don't want anymore. The Reason behind this error message is that some other program is using the file/files in folder and the only way to delete the file/folder is to kill all the processes using the file/folder.


Well, you need a software to kill the processes running behind and the best one to use in this situation is KillBox.
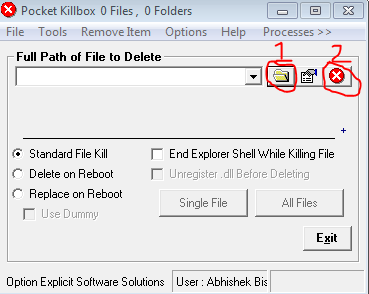
KillBox ends all the processes associated with the file/folder you want to delete. You can download KillBox from here. You don't need to install KillBox, just click on KillBox.exe and a window will show up(see screenshot):

Now, click on 1(red circle) and choose the file/folder you want to Delete and then click on 2(red circle) and Tada! The file/folder will be deleted.

Related Posts Widget for Blogger

To Block Websites Without Using Any Software [Windows]


Why do you want to Block a specific Website? Or a Specific Type of Websites? Maybe because they are addictive – you waste most of your precious time surfing on them. Many of these so called ‘Time Wasting’ Websites include Facebook, Twitter, MySpace, and other Social Networking Sites. Here’s a very easy to apply setting which can block a website specified by you. In this tutorial, I’ll not ask you to download any kind of Software. All you have to do is edit a Hosts File (and don’t worry! It’s very easy to do so).
 
Follow these simple steps to block a website or a set of website:
[1] Open Run. To do so, search for ‘Run’ on the Start Menu Search Bar. Alternatively, you can use a key combination: Windows Button on Keyboard + R.

[2] Type in (or copy) the following file address on the Run Box.
c:\WINDOWS\system32\drivers\etc\
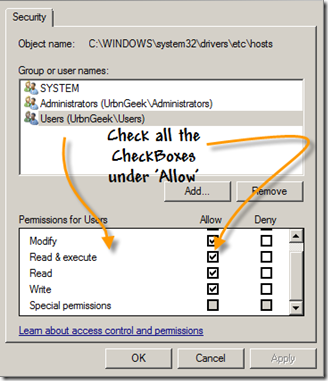
[3] A Folder will open where there will be a File Named ‘hosts’. Right Click on that File and Select ‘Properties’. A New Window will appear. Now, under the ‘Security’ Tab, Click on ‘Edit’ Button and another windows will appear. On that window, select ‘User’ followed by your Computer Name closed in Brackets like this : Users(UrbnGeek\Users). Here’s the screenshot:
23

[4] Now, check all the Checkboxes under under allow (as done in the screenshot) and then click on ‘Apply’ and then ‘OK’.

[5] Now, close all the windows except the folder window where ‘hosts’ file is located.

[6] Double Click on the ‘hosts’ file and then Windows will ask you if you want to search the internet for the supported application or you want to use an application already installed on your computer. Select the latter one.

[7] You’ll now be presented with a list of programs. Select ‘Notepad’ and click on ‘OK’ Button.

[8] A Notepad will open. Go to the last line, that is 127.0.0.1       localhost and as soon as it ends (one line after it) type in or copy the following line:
127.0.0.1 NameOfYourWebsiteWhichYouWantToBlock.com
Replace the line after the IP Address with the URL of the website which you want to block. For example, if you want to block Facebook.com, then type in: 127.0.0.1 facebook.com

24

After you save this settings, then try to open the blocked website. You’ll see an ‘Error’ page in any Browser installed on you computer. To unblock the sites, remove the added lines from the notepad.

Sunday, July 3, 2011

Mobile App for Faster Browsing on GPRS / 3G


I recently came across a mobile application called Insta7 and found it quite useful for mobile users in India. The mobile app, shows the latest news updates, cricket scores and even latest flight status updates.


1)While using mobile phones, there are many apps and websites we browse from the phone browser. This can actually make browsing on the internet a little tedious. With useful links and information, organized in its layout under specific categories, Insta7 makes browsing a lot faster.
The service can be looked up by downloading their app or by simply visiting

Code:
http://insta7.com from the mobile browser.

The app works fine with almost every mobile phone. It works with GPRS (2G), 3G and WiFi connection.
Insta7 makes sense for GPRS users

In India, we do not have wide availability of 3G and WiFi spots are also not very common. This means we have to end up using the slower GPRS connection to browse on our mobile phones.

Insta7 makes it a lot easier for GPRS users to quickly browse instead of waiting for individual apps or websites to load up.

Monday, June 27, 2011

DOWNLOAD NOKIA OVI STORE APPS DIRECTLY TO UR PC


download Ovi Store apps to computer, which can be later transferred to your Nokia phone. Just follow this article thoroughly.

What you need to use:

    * Mozilla Firefox 3.6.10 or earlier.
    * PC running Windows OS.
    * Nokia Multimedia phone.
    * Nokia account.

How to download Nokia Ovi store application to PC:

    * Open Mozilla Firefox and go to Tools >> Add-ons.
    * Click on Get Add-ons tab and search for User Agent Switcher.
    * Install User Agent Switcher and restart Firefox.
    * Open Notepad and paste the following codes:


Code: [Select]
 
<useragentswitcher><useragent description=”Internet Explorer 7 (Windows Vista)” useragent=”Mozilla/4.0 (compatible; MSIE 7.0; Windows NT 6.0)” appcodename=”” appname=”Microsoft Internet Explorer” appversion=”4.0 (compatible; MSIE 7.0; Windows NT 6.0)”platform=”Win32? vendor=”” vendorsub=””/><useragent description=”Netscape 4.8 (Windows Vista)” useragent=”Mozilla/4.8 [en] (Windows NT 6.0; U)” appcodename=”” appname=”Netscape” appversion=”4.8 [en] (Windows NT 6.0; U)” platform=”Win32? vendor=”” vendorsub=””/><useragent description=”Opera 9.25 (Windows Vista)” useragent=”Opera/9.25 (Windows NT 6.0; U; en)” appcodename=”” appname=”Opera” appversion=”9.25 (Windows NT 6.0; U; en)” platform=”Win32? vendor=”” vendorsub=””/><useragent description=”Nokia 5230? useragent=”Mozilla/5.0 (SymbianOS/9.4; U; Series60/5.0 Nokia5230/10.0.067; Profile/MIDP-2.1 Configuration/CLDC-1.1 ) AppleWebKit/413 (KHTML, like Gecko) Safari/413? appcodename=”” appname=”” appversion=”” platform=”” vendor=”” vendorsub=””/></useragentswitcher>
 

    * If you are not using Nokia 5230, Replace all 5230 in the above code with the model number of your phone, like N97 for Nokia N97, or E71 for Nokia E71, and so on.
    * Save this file with .xml extension.
    * Now open Firefox and go to Tools >> Default User Agent >> Edit User Agents.
    * Click on Import.
    * Browse and add the above mentioned .xml file.
    * Now go to Tools >> Default User Agent and select your phone’s model number.
    * Open http://store.ovi.mobi/.

Now, on your Nokia phone, Firefox will work as the default browser, and you can download any Ovi Store file on your PC, and then transfer them to your phone via USB cable or Bluetooth.

For your notification: Once you complete downloading Ovi Store applications, change user agent back to default user agent, by going to Tools >> Default User Agent >> Default User Agent.

If not, Firefox will keep behaving like your mobile phone’s browser.

Collection Of New Use Full Sites Must See It


There are thousands of websites which were released in 2010.
Some are very useful to day to day life. The websites which i
am going to give now are very useful sites as per my
knowledge. But these sites are not much into people. This is
my own websites collection which you will like for sure. I may
miss some very useful sites which are not famous enough. In
that case, please mention them in the comments section
below. I am personally saying the sites are not famous
because of the Alexa ranking of the sites. Not all the sites are
unpopular below. Some are too good in ranking, but people
are not aware of them properly.

1. MathTV.com – Awesome website to learn mathematics
with experts advice.

2. PrivacyDefender – The Easy Way to Control Your Facebook
Privacy Settings.

3. Funphotobox – Add your own pictures in funny,GIF images
with default frames.

4. DiffChecker – A tool that quickly & easily gives the text
differences between two blocks of text.


5. Kurrently – A real-time search engine for Facebook and
Twitter.


6. Logaway – Free Online Password Manager (1 login for
1000′s of sites)


7. Picknzip – Allow you to download photos from Facebook in
a single zip or pdf file.


8. Boston/BigPicture – New Stories in Photographs.


9. Ohlife – A Personal Journal.


10. TuxPaint – A Open Source Drawing Software for Children.


11. Explania – Watch hundreds of animated explanations,
interactive tutorials.


12. Twithelp – Simple and quick Twitter Help.


13. Fflick – fflick is movie reviews by you and your friends.


14. USBFlashCopy – A small Windows utility to back up your
flash drives & storage cards.


15. Flisti - Create free online polls without signing-up.


16. Unhearit - Listen Awesome Songs 24/7 Without Any Non-
sense.


17. Clipconverter – Free Best Online All Media Converter.


18. Jottle – A Face to Face Chat Without Any Non-sense.


19. Talkminer – Search inside video lectures and talks.


20. LearnBoost – A Free and amazing Gradebook.


21. TinEye – Image Search engine which displays all the
information about that image.


22. Keepaboo – About your child and Capturing memories.


23. HappyCV - A Free Online Resume Builder.


24. Blekko – A Search Engine which uses slashtags to search
the results.


25. Vye Music – All the music you could need. Find it and play
it.


26. MomentGarden - Create and Share our Child’s Story.


27. Lockittight – Provides theft recovery assistance for mobile
devices.


28. Findbigmail – Increase your gmail account mail space.


29. HateVille – Like What Others Hate.


30. Psykotube – A Video Search Engine Site.


31. ListFav - Lists out your favorite things in all categories.


32. 8Tracks – A handcrafted internet radio to share & discover
music online mix.


33. AlertFul – Reminds you of the important events by email.


34. Failin – Know what your friends and people think of you.


35. Vsee – High Quality, Low Bandwidth Video Conference.


36. CForum – A Discussion point to post all your computer
related queries.

HOW TO BOOST AND INCREASE INTERNET SPEED


By Default, XP reserves 20% of your bandwidth for it’s own use. This is a crying shame and should be undone immediately. To do this, you will not require any additional software, just follow the steps below.
Access the Group Policy Editor. This can be done by typing gpedit.msc in the Run box (Start, and then Run). You will now be looking at something like this.

Navigate to Computer Configuration/Administrative Templates/Network/QOS Packet Scheduler using the pane on the left side.
In the left pane, there should be a Setting with the name Limit reservable bandwidth, right-click this and select properties.
Now this might seem a bit weird, as the State will say “Not Configured” but Windows by default will reserve 20%. So the trick is to set it to reserve 0%. You can do this by clicking enabled and then setting the Bandwidth Limit % to 0. It should look like the image below.

Hit OK then close the Group Policy Editor.
That’s it! You’re done with the first tweak. Just a quick side note here, there are lots of other little things you can change easily using the policy editor. Feel free to wander around!
Tweak 2: Optimizing TCP/IP settings
This next tweak is going to require a piece of freeware called SG TCP Optimizer. This nifty little utility will optimize the manner in which your PC sends and receives data packets, which will as a result speed up your connection. Though It is most effective for broadband connections, it works for just about any type of connection.
 Download SG TCP Optimizer. You don’t need to install it, just double-click and it will run. Once you run it, you should be looking at this :

That is quite an intimidating interface, but we won’t be touching most of it. Under the General Settings tab, just drag the slider to match your connection’s download speed. Then, at the bottom of the same window, select the “Optimal Settings” radio button and click “Apply Changes”.
You will now be looking at a window like the one below.

Make sure that the “Backup” tick box is ticked and then click OK.
All that’s left is to reboot your system, in order to apply the changes. You will be prompted to do so.
Once your system has rebooted, surf around for a while. If for whatever reason you feel your connection has been affected negatively, then fear not, for the changes you made can be undone. Start SG TCP Optimizer, click File and choose restore backed up settings. This will bring up a dialog box where you can navigate to where you downloaded the program. There, you will find a file with the extension .spg with a filename containing the date.
For example If you applied the changes on the 21st of February “sg_backup_2008-02-21-xxxx.spg” would be the filename, where the xxxx is any number. Once you find this file select it and press open. This should bring to a dialog box similar to the one shown above. Click OK and reboot. Your original settings are now restored.

Wednesday, June 22, 2011

how to make super hidden files or folders


1. Open a command prompt

Click Start button-> select Run -> type "cmd" ( XP )

Click Start button-> type "cmd" in the seach box ( 7 )

2. Then press Enter


3. type "cd path_of_your_file" to go to place of your file
4. then type "dir" to view content of folder

5. then type "attrib +s +h file's_name" then press Enter
6. then view again with "dir" command

((** if u want show the hidden file just remove "+" and that place add "-"**))

Desktop shortcut for locking your computer


Creating a desktop shortcut for locking your comp!

If you use your computer in an area where others may have access to it, and there are things on your system you would rather have kept confidential, locking your desktop when you leave the computer is an essential task. Here’s a recipe for a desktop shortcut that will lock your computer in two easy clicks:

Right click on an empty area of the desktop and choose ‘new’ then ’shortcut.’ The create shortcut wizard will open; in the first text box, type ‘%windir%\System32\rundll32.exe user32.dll,LockWorkStation’ and then give your shortcut an appropriate name on the next page, and hit ‘finish.’

You will notice that the shortcut you created has a blank icon. To select a more appropriate one, right click on the shortcut and hit ‘properties.’ In the ’shortcut’ tab, click the ‘change icon’ button.

In the ‘look for icons in this file’ box, type ‘%SystemRoot%\system32\SHELL32.dll’ then click ‘ok’ to see a range of icons for your new shortcut. Choose an appropriate icon. Your desktop locking shortcut is now ready for use. Test it out.

Remove Shortcut From Pen Drive


Click on "Start" -->Run --> type cmd and click on OK.
Here I assume your pen drive letter as G:
Enter this command.

attrib -h -r -s /s /d g:\*.*

You can copy the above command --> Right-click in the Command Prompt and
paste it.
Note : Don't forget to replace the letter g with your pen drive letter.
Now press "Enter".
Now check for your files and folder in Pen Drive.

Monday, June 20, 2011

Login in XP without password


1) start computer
2) when it asks for
password press ctrl+alt
+delete keys twice
3) Now another window
opens asking for
password
4) in this at the place of
user name just type
administrator....leave the
password feild blank and
hit enter
5)wow u have logged in
as a normal user
6) now u hav full
authority only problem is
that u can't open my
document of the original
account.
7) don't worry abt. this
just use any file recovery
softwere and move the
files from acess denied
my document to any
other folder (in other
drive)

Saturday, June 18, 2011

Rename the 'start' button in xp.


First of all you'l need a software 'resource hacker' which is a freeware n u'l get it anywhere.

After that u'l have to follow these steps carefully.
Open the software,
1. File > open >c:\windows\explorer.exe

2. View > expand tree > string table > 37 > 1033 > 'double click' the 'start' and change accordingly.

3. After that click the 'compile scrip' option on the top of the open window.and save it as anything.exe


This was the first step. Now, get ready to entr in your system........

1. Goto 'run' and type regedit and press enter.

2. Once u get in it, goto
HKLM > software > microsoft > windows NT > CurrentVersion > [Winlogon]
After coming here goto the right hand side and double click on the 'shell' and chang the attribute to anything.exe which we've created b4. Now u'r done. Restart to c the change...... Thnx.

How to Super hide files and folders


Sometimes its necessary to hide our important files so that no one can access it, and im gona tel u how to do it, its nt that im going to select the 'hidden' attribute after viewing the properties of the file or folder.
 Its something realy difrnt 4m that, jst c.

First open notepad and type the folowing:

Attrib +s +h (full path of the file/folder)

And save it as anything.bat, u can sav it anywhere.
After that double click and run it.
Now your file or folder is hidden. U won't c it even if u show hidden files and folders from the folder option. And to show it again, all u hav to do is change the + sign to -

Eg: attrib +s +h c:\windows

Here, windows wil b hidden.

Thursday, June 16, 2011

Free ur Ram For Boosting the System Speed


ஜ▬▬▬▬ஜ۩"KING-HACKER"۩ஜ▬▬▬▬●ஜ
(((Free ur Ram 4 Boost the System Speed)))
ஜ▬▬▬▬ஜ۩"KING-HACKER"۩ஜ▬▬▬▬●ஜ

Well, if you facing slow speed problem due to low volume ram.
then i have a trick to take free some amount of your ram,it will boost your system performance.
To do so..

>open notepad

>type:  FREEMEM=SPACE(640000)

>Save it as - freeRAM.vbs

>close the notepad

>Now, Double click on it always,when you want to free some space of your ram.